Pro Tools Playlists
One key to quick and effective recording is the use of Pro Tools playlists. Playlists allow us to save and switch between multiple performances, whether of entire band tracks or vocal or instrumental takes. A stack of playlists cut to the same click allows quick editing and compiling of our favorite bits of each performance into a finished song. Knowing how to get around playlists quickly opens many possibilities and options.
It is advisable to start any new project by first creating new playlists on all recording tracks so that the recorded playlists will start with the suffix .01. That way, Playlist.01 will designate take one, .02 the second, and so forth. It is wise to rename duplicated playlists appropriately (by double-clicking on the name), and for instance, using “Gtr Solo Edit.”
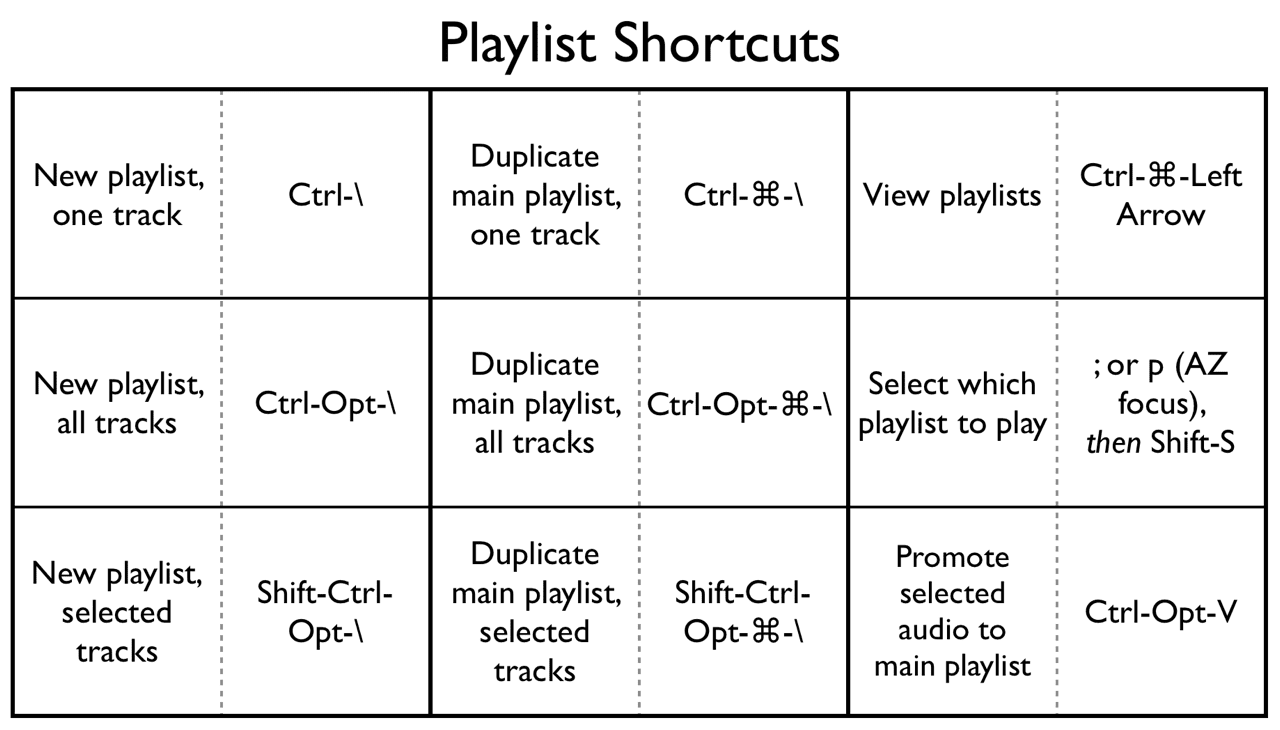
New or duplicate playlists can be created from the menu next to the track’s name in the Edit Window, designated by a downturned triangle. However, faster and spiffier than mousing around is using shortcuts, a summary of which is found at the end of this article.
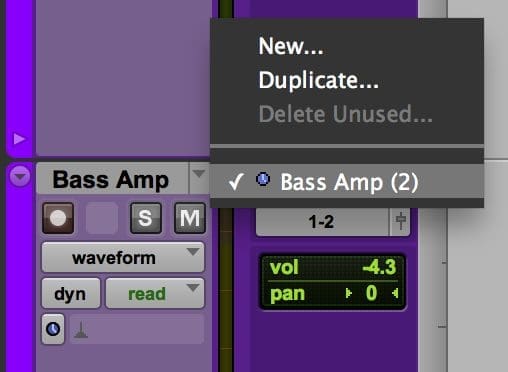
Creating New Playlists
To add a new playlist on a single selected track, use Control-\ (backslash). As always in Pro Tools, the option key means “do this to all,” so Control-Option-\ creates a new Pro Tools playlist on all tracks (including inactive ones). Adding shift (Control-Opt-Shift-\) creates new playlists only on selected tracks.
Selecting Preferences>Operation automatically creates new playlists while loop recording and does what it says. Each time it loops to a new recording, it creates a separate playlist.
In PT 12.6 and up, selecting Preferences>Editing> sends fully overlapped clips to available playlists while editing/recording. Engaging layered editing automatically creates a new playlist if you record over an existing clip. It puts the original clip on it; that way, you don’t lose music.
Duplicating Playlists
It’s a good idea to edit on a duplicated playlist to be able to go back to the original if need be. Duplicating playlists allows us to preserve the original performances while trying out multiple edited versions and to save safety copies before conducting destructive processes such as rendering Audiosuite plugins, consolidating, etc.
When bouncing or performing mixes back into Pro Tools, we can also save multiple mix versions, punch in, and edit the best mix sections together.
The shortcut for duplicating a playlist is the same as the new playlist one, with the addition of the Command key: (Control-Command-\). Adding the option key duplicates the currently selected playlist on all tracks: (Control-Option-Command-\) As above, adding shift duplicates the displayed playlists only on selected tracks: (Shift-Control-Option-Command-\).
Selecting Playlists
To switch between playlists on a track, click in the mini-menu just to the right of the name. To change all tracks recorded together, such as multiple takes of a song, to a particular take/playlist number, engage the “All” group, or hold option while changing the playlist selection on one track. Simpler yet, in Pro Tools 12.6 and up, use the handy Command-Up/Down Arrow command to audition playlists on a track.
Pro Tools uses some clever logic. If you overdub over a later group of playlists, switch the tracks to an earlier playlist using the “All Group” or option key. It will duplicate your overdub into a correspondingly numbered playlist, keeping playlist switching coordinated.
Showing/Hiding Playlists
Once multiple playlists are recorded on a track, you can show them all by selecting “playlists” from the dropdown menu just below the record, solo, and mute buttons. Again, it’s good to be in the habit of using shortcuts- from the waveform view, Cmd-Ctrl-Left Arrow selects playlist view. Cmd-Ctrl and the left or right arrows allows one to flip between the various track views in the Edit Window- hitting the alphanumeric minus key returns to the waveform view (and hitting it again toggles between volume and waveform views).
Control and the up/down arrows make the top playlist taller or shorter on selected tracks and, by adding the option key, affects all tracks in the session. Playlist heights can also be adjusted by selecting a track height from the triangle menu icon to the left of the tracks’ name or by dragging the lines between the playlists at the left. Or, right-click in the ruler between the track information and waveform, and choose a height. Boy Scout salute (as we call Ctrl-Opt-Cmd at the Blackbird Academy), plus the up or down arrow will fit all visible playlists and tracks vertically in the window. As usual, there are multiple ways to achieve the same result.
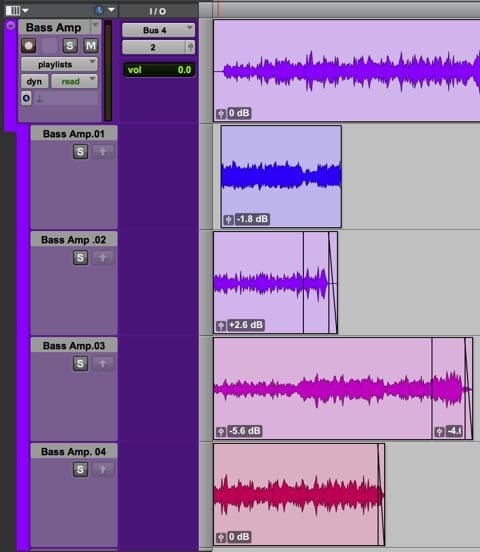
Notice that when you select playlist view, the individual playlists appear in the tracks/groups window at the far left of the edit window and can be hidden or shown by clicking on the dots next to their names. If the Tracks and Groups window isn’t showing, look for a left-facing arrow at the very bottom left of the Edit Window.
Auditioning Playlists
Here is how to quickly switch playback between Pro Tools playlists: select the track and display playlists. Shift and S solos that track, as usual. But instead, let’s say we want to play the rest of the music while switching between playlists to audition different vocal takes in context quickly. If we hit semicolon once, then shift and S, we hear our next to last playlist with the track. Hit semicolon as many times as we want to move down the playlist stack (or p to move up), then Shift-S to audition. Shift+S without; or p switches between the selected playlist and the uppermost one, presumably your master edit playlist.
To actually solo the track, hit p as many times as needed to select the top playlist, Shift-S, et voila! Semicolon or p followed by Shift+S still allows you to select different playlists while the track is soloed. As before, Shift+S without a semicolon or p switches between the selected playlist and the top, main one.
Comping and Editing Playlists
There are many ways to compile playlists. First, create a new empty playlist onto which to build your new performance (Control-\), and name it something appropriate, i.e. Solo Comp. Or, if there’s one playlist that is mostly keeper material, duplicate it (Ctrl-Cmd-\), and rename it.
Here’s the best and fastest way to compile audio onto the main playlist. Audition the audio as in the previous section, select the desired parts, then copy them to the master comp playlist by hitting Ctrl-Opt-V. There are so many keyboard shortcuts in Pro Tools, but remembering this one will save you thousands of seconds!
Here’s an additional method. Enter Object Grabber mode by hitting Command and alphanumeric 4 until your tool is a grabber hand with two small rectangles. Separate the bits you want by pressing “B” in keyboard focus mode (the AZ button in the upper right is lit). Select all clips you want by shift-clicking. Then, using your new favorite shortcut (Ctrl-Opt-V), they can all be comped at once onto the main playlist. If the selected clips overlap, priority will be given to the higher (more recent) playlist.
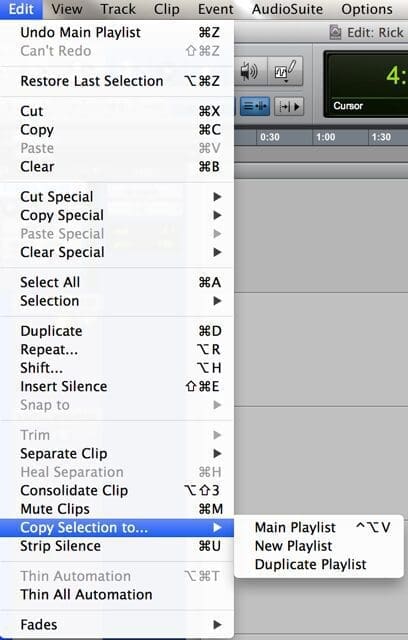
There are a number of viable but much less efficient ways to comp. You could also use the Edit Menu>Copy Selection To> Main, New, or Duplicate playlist. Normally you would use “Main” unless you want to duplicate or create a new one.
You can click on the upwards-pointing arrow next to the solo button for the playlist, which “promotes” selected audio to the main playlist- but, Ctrl-Opt-V is the shortcut for this.
Or, you could highlight sections you like and copy them (“C” in keyboard focus mode), use P to move up the stack to your master playlist (semicolon to move down), then paste (“V”). Alternatively, you could separate the sections you want to move (“B”), and Control-Option-drag them up-control keeps them from moving in time, and option leaves the original in place. These methods are slower.
Once the master playlist is comped to your liking, crossfade and check your edits. Compensate for level discrepancies with clip gain or automation, duplicate it so you can revise if need be, and consolidate it into one file (select everything on the playlist, and Shift-Opt-3 alphanumeric).
Rating Clips and Filtering Viewed Playlists
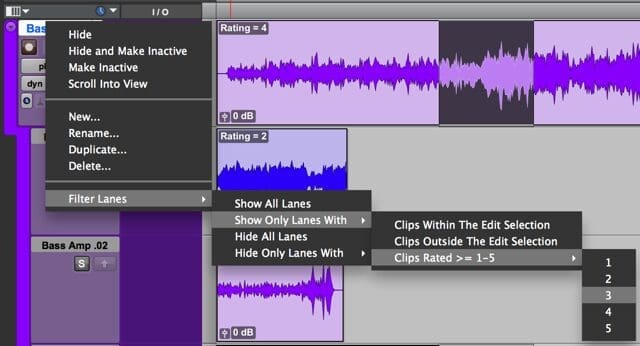
Pro Tools has a system for rating clips and filtering them so that only playlists containing clips rated above or below a certain number are shown. Right-click on each clip and select a rating 1-5, or three-finger salute (Ctrl-Opt-Cmd) and 1-5 on the numeric keypad. You decide whether 1 or 5 is best. Selecting View>Clip>Rating displays the ratings of each clip.

Once rated, you can choose to show or hide the playlists according to certain parameters. Right-click on the name of the Pro Tools playlist or in the waveform view, and go to the bottom of the menu that appears to “Filter Lanes.” You can show or hide them all, filter by clip location or rating above or below the number you choose, 1-5.
And, there you have it — a summary of how to work with playlists in Pro Tools. As ever, practice creates familiarity and speed. The goal is to know these processes so well that you don’t have to think about the mechanics and can focus on creating great recordings. Happy playlisting!
Are you a beginner or more of a seasoned pro in the studio? Find out with our Studio Quiz.
Other stories you may like
August 13, 2021
How to record a guitar amp using multiple microphones
If you want to avoid phase issues while recording guitar amps, use one…
July 22, 2021
July 2021 Summer Recording Camp
July 22, 2021In Featured, CampsBy Mark Rubel These 12 high school students…
July 22, 2021
BBA Adds Two New Studio Instructors
Two new staff members have joined The Blackbird Academy’s Studio…

